Tuesday, February 19, 2013

Oracle SOA/BPEL - To turn off the Auto recovery SOA Server 11g


You can try the following steps based on your process if it is: synchronous or async

Scenario 1:

 Auto Recovery only for BPEL Auto recovery is only applicable  for Async and Durable processes.

 To supress auto recovery at BPEL level:
 1. In the navigator, right-click soa-infra and select SOA Administration  BPEL Properties.
 2. Click More BPEL Configuration Properties.
 3. In the Name column, click RecoveryConfig.
 4. expand RecurringScheduleConfig :
     set maxMessageRaiseSize = 0 ( default : 50)
           stopWindowTime = 00:00 ( default: 04:00) 4. expand:
 StartupScheduleConfig
     set maxMessageRaiseSize = 0 ( default: 50)

 Scenario 2: Auto Recovery only for  for Sync processes

 1. In the navigator, right-click soa-infra and select SOA Administration  Common Properties  Advanced  More SOA Infra Advanced Configuration Properties...

 2. In the Name column, click GlobalTxMaxRetry ( The maximum number of times a GLOBAL_RETRY FabricInvocationException can be retried before bubbling up).

 3. set GlobalTxMaxRetry = 0 ( default : 2)

 4.similarly, GlobalTxRetryInterval ( The number of seconds between retries in the case of GLOBAL_RETRY FabricInvocationException )
     set GlobalTxRetryInterval = 0 ( default: 3)

Monday, February 18, 2013

Oracle SOA/ BPM - SQL Authenticator Integration with HWF/WorkList App

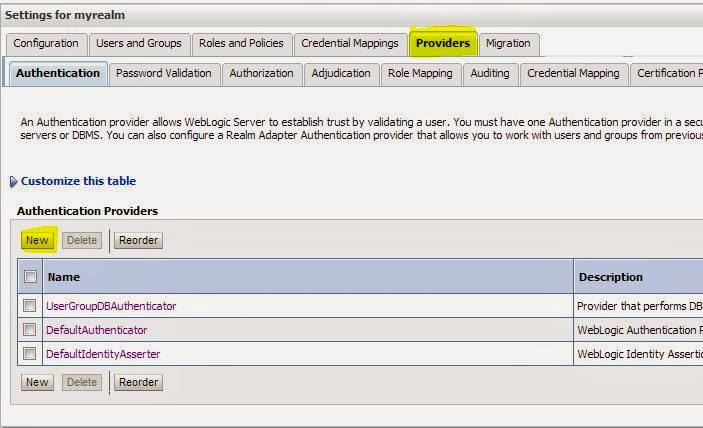
Please refer my previous blog to know how to configure SQL Authenticator
Configure SQL Authenticator

Please follow these steps

Changed default realm

(EM Console)Changed the value of key “WorkflowIdentityConfig.ConfigurationType” from default “jazn.com” to “myrealm” by executing the “setRealmName” operation

soa-infra ->Administration -> System Mbean Browser -> Application Defined Mbeans - > oracle.as.soainfra.config -> Server - > WorkflowIdentityConfig -> human-workflow -> WorkflowIdentityConfig.ConfigurationType -> select the configuration and rename by invoking the operation setRealmName
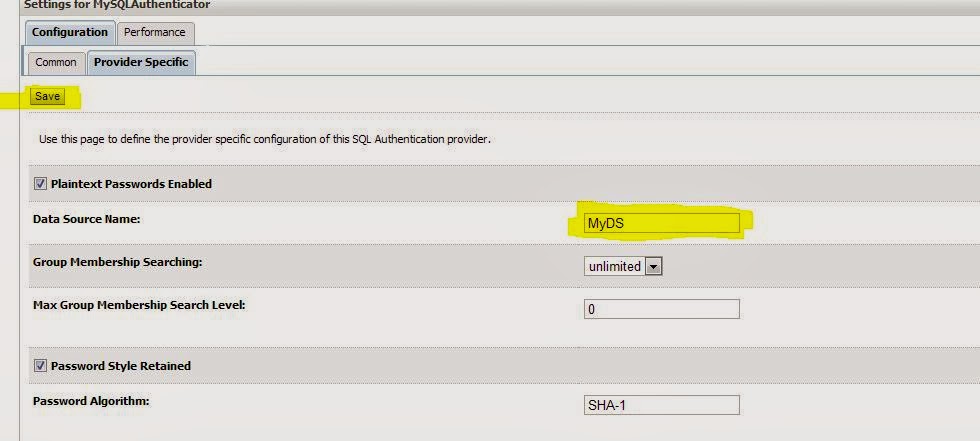


SQL Authenticator Configuration for BPM worklist and Human Task Flow


Download the attachment: workflow-120-SQLIdentityProvider.zip 
Copy dbprovider.jar from workflow-120-SQLIdentityProvider\lib to MW_HOME/user_projects/domains/{soa_domain}/lib

Follow the steps below:
1. Shutdown SOA and Admin Server
 2. Navigate to MW_HOME/user_projects/domains/{domain_name}/config/fmwconfig
 3. Backup jps-config.xml
 4. Edit jps-config.xml and make the following modifications
   A. Modify
   <serviceInstanceRef ref="idstore.ldap"/> to
   <serviceInstanceRef ref="idstore.custom"/>
     under <jpsContext name="default">
   B. Add
      <serviceInstance name="idstore.custom" provider="custom.provider"
 location="dumb">
                <description>Custom Identity Store Service Instance</description>
                 <property name="idstore.type" value="CUSTOM"/>
                 <property name="ADF_IM_FACTORY_CLASS"
 value="org.sample.providers.db.DBIdentityStoreFactory"/>
                 <property name="DB_SERVER_NAME" value="db_host_name"/>
                 <property name="DB_SERVER_PORT" value="db_port"/>
                 <property name="DB_DATABASE_NAME" value="db_sid"/>
                 <property name="ST_SECURITY_PRINCIPAL" value="db_user"/>        
                 <property name="ST_SECURITY_CREDENTIALS" value="db_passwd"/>   
                 </serviceInstance>
    under <serviceInstances>
      change the db_* parameters as per the environment
  C. Add
 <serviceProvider type="IDENTITY_STORE" name="custom.provider"
 class="oracle.security.jps.internal.idstore.generic.GenericIdentityStoreProvider">
               <description>Custom IdStore Provider</description>
                </serviceProvider>
  within <serviceProviders> </serviceProviders>
 .
 5. Start SOA/Admin server
  Now logging on to worklist application should work.


  I have tested this on my local machine and it works.
6. You can also configure human task from JDeveloper to add user from SQL authenticator.For that realm setting is must as mentioned in  "Changed default realm"  step.

Oracle SOA/BPM - Configure SQL Authenticator


Here i am going to demonstrate how to configure SQL authenticator on Weblogic server and view users and groups. I am using sample tables here. You can configure you own tables.

Database setup(sample)

  1. Create some database tables to be used for the SQL authenticator. SQLplus could be used. Use the following script to create the default schema used by WLS:
CREATE TABLE USERS (
U_NAME VARCHAR(200) NOT NULL,
U_PASSWORD VARCHAR(50) NOT NULL,
U_DESCRIPTION VARCHAR(1000))
;
ALTER TABLE USERS
ADD CONSTRAINT PK_USERS
PRIMARY KEY (U_NAME)
;
CREATE TABLE GROUPS (
G_NAME VARCHAR(200) NOT NULL,
G_DESCRIPTION VARCHAR(1000) NULL)
;
ALTER TABLE GROUPS
ADD CONSTRAINT PK_GROUPS
PRIMARY KEY (G_NAME)
;
CREATE TABLE GROUPMEMBERS (
G_NAME VARCHAR(200) NOT NULL,
G_MEMBER VARCHAR(200) NOT NULL)
;
ALTER TABLE GROUPMEMBERS
ADD CONSTRAINT PK_GROUPMEMS
PRIMARY KEY (
G_NAME,
G_MEMBER
)
;
ALTER TABLE GROUPMEMBERS
ADD CONSTRAINT FK1_GROUPMEMBERS
FOREIGN KEY ( G_NAME )
REFERENCES GROUPS (G_NAME)
ON DELETE CASCADE
  1. Populate the database using this script:
insert into USERS (U_NAME,U_PASSWORD,U_DESCRIPTION) values('system','weblogic','admin user');
insert into GROUPS (G_NAME,G_DESCRIPTION) values('Administrators','Administrators');
insert into GROUPMEMBERS (G_NAME,G_MEMBER) values('Administrators','system');

WebLogic server configuration

  1. Create a data source with the information of the database previously configured.
    • Data base type: Oracle
    • Driver: Oracle's Driver (thin) for instance connections; Versions: 9.0.1,9.2.0,10,11
    • Target: AdminServer/SOA Server
  2. Create a SQLAuthenticator:
          Log into the Administration Console.
          Go to Security Realms.
          Select myrealm > Providers.
       
  Click on New.
 Provide a name for the new provider (e.g. MySQLlProvider).


Set SQLAuthenticator as provider type.
Click on OK and the new provider should appear on the list of available providers.
Click on the new provider.
Change control flag to SUFFICIENT


Go to Provider Specific
Specify the Data Source Name. Use the information of the data source previously created.
Select the Password Style as Plaintext
Leave the rest as default.
Click on Save


Set the control flag to SUFFICIENT for all the authenticators (DefaultAuthenticator) in the list.

 Reorder the Authentication Providers


As non-dynamic changes were done, WebLogic Server needs to be restarted.

Testing the SQLAuthenticator

  1. Log into the Administration Console.
  2. Validate that users from the database were retrieved. Go to Security Realms -> myrealm -> Users and Groups and review if users of the provider sqlProvider were loaded.

In next blog, i will demonstarte how to integrate Human Task and Worklist app with SQL authenticator.